i blog for fun..and mostly about painting furniture. so when one of my 3 readers asks for technique tips, i’m humbled and sort of freaked out. i’m by no means an expert. i just sneak moments after the kids are asleep to paint stuff i find on the side of the road.
with kids, i’ve come to love the Restoration Hardware distressed and rustic finish b/c the abuse Hot Wheels and Legos have on the furniture is to only make it look better! so i’ve taught myself how to replicate the look with chalk paint.
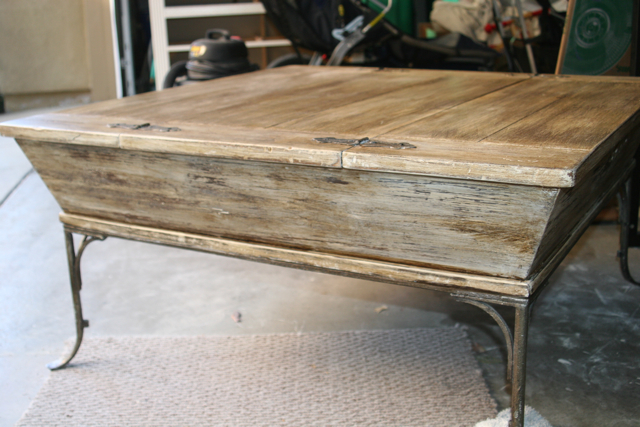
what’s shocking is this horrible picture of my zero to hero coffee table is pinned and repinned off my site more than anything. why? i don’t know. the photo isn’t fancy. so much for all the photo editing i do! 🙂
i always respond to questions sent my way. i rarely hear back…and in this one instance, i was stoked to see the results! look at how RAD this turned out!

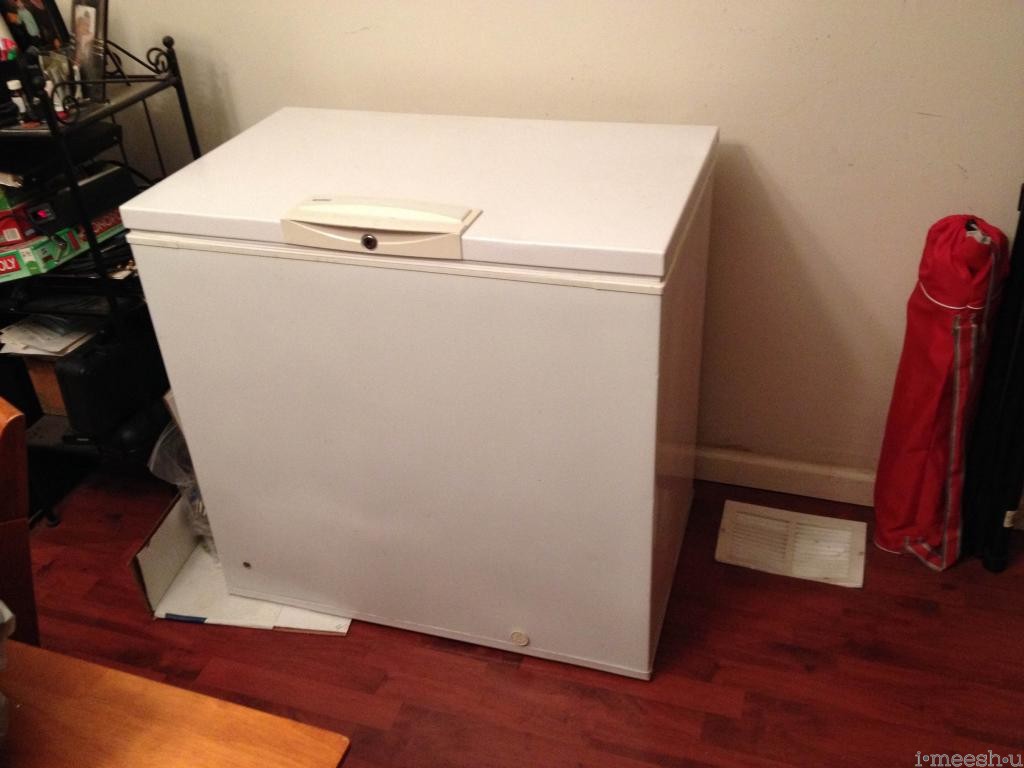
Josh wrote me from Philly and said he was building a keezer (keg out of a freezer) but wanted it to look like Restoration Hardware on the outside.

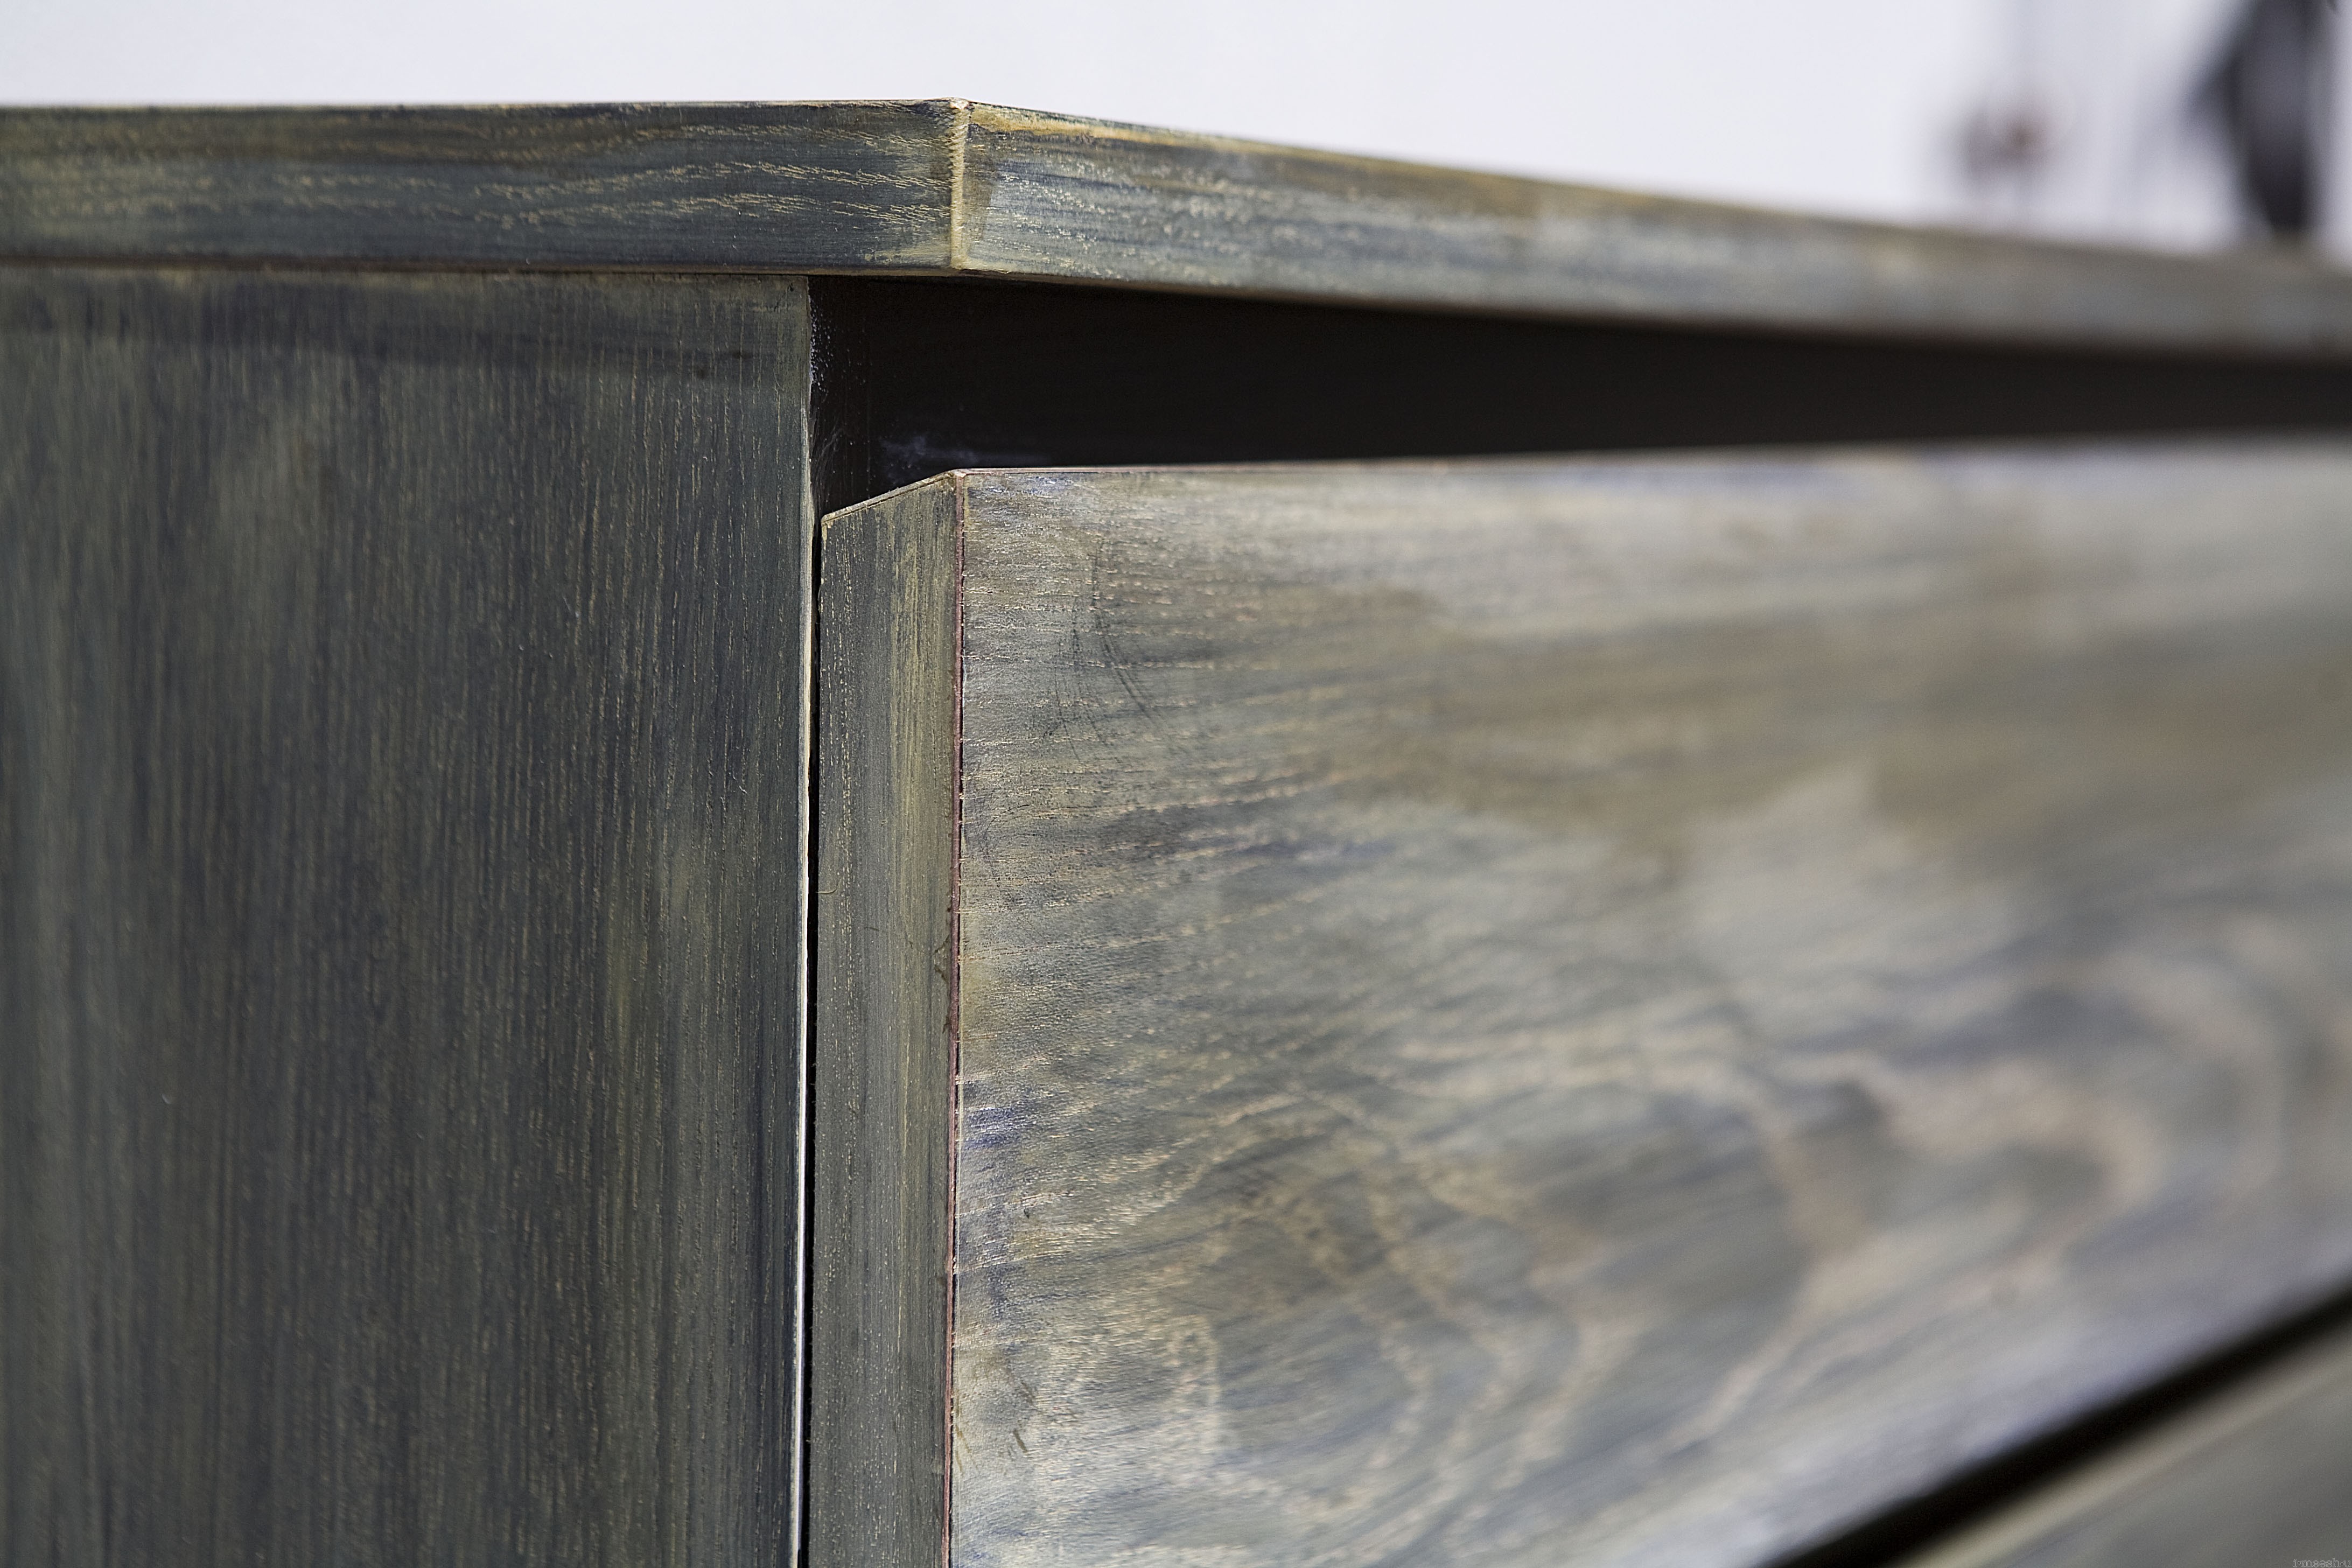
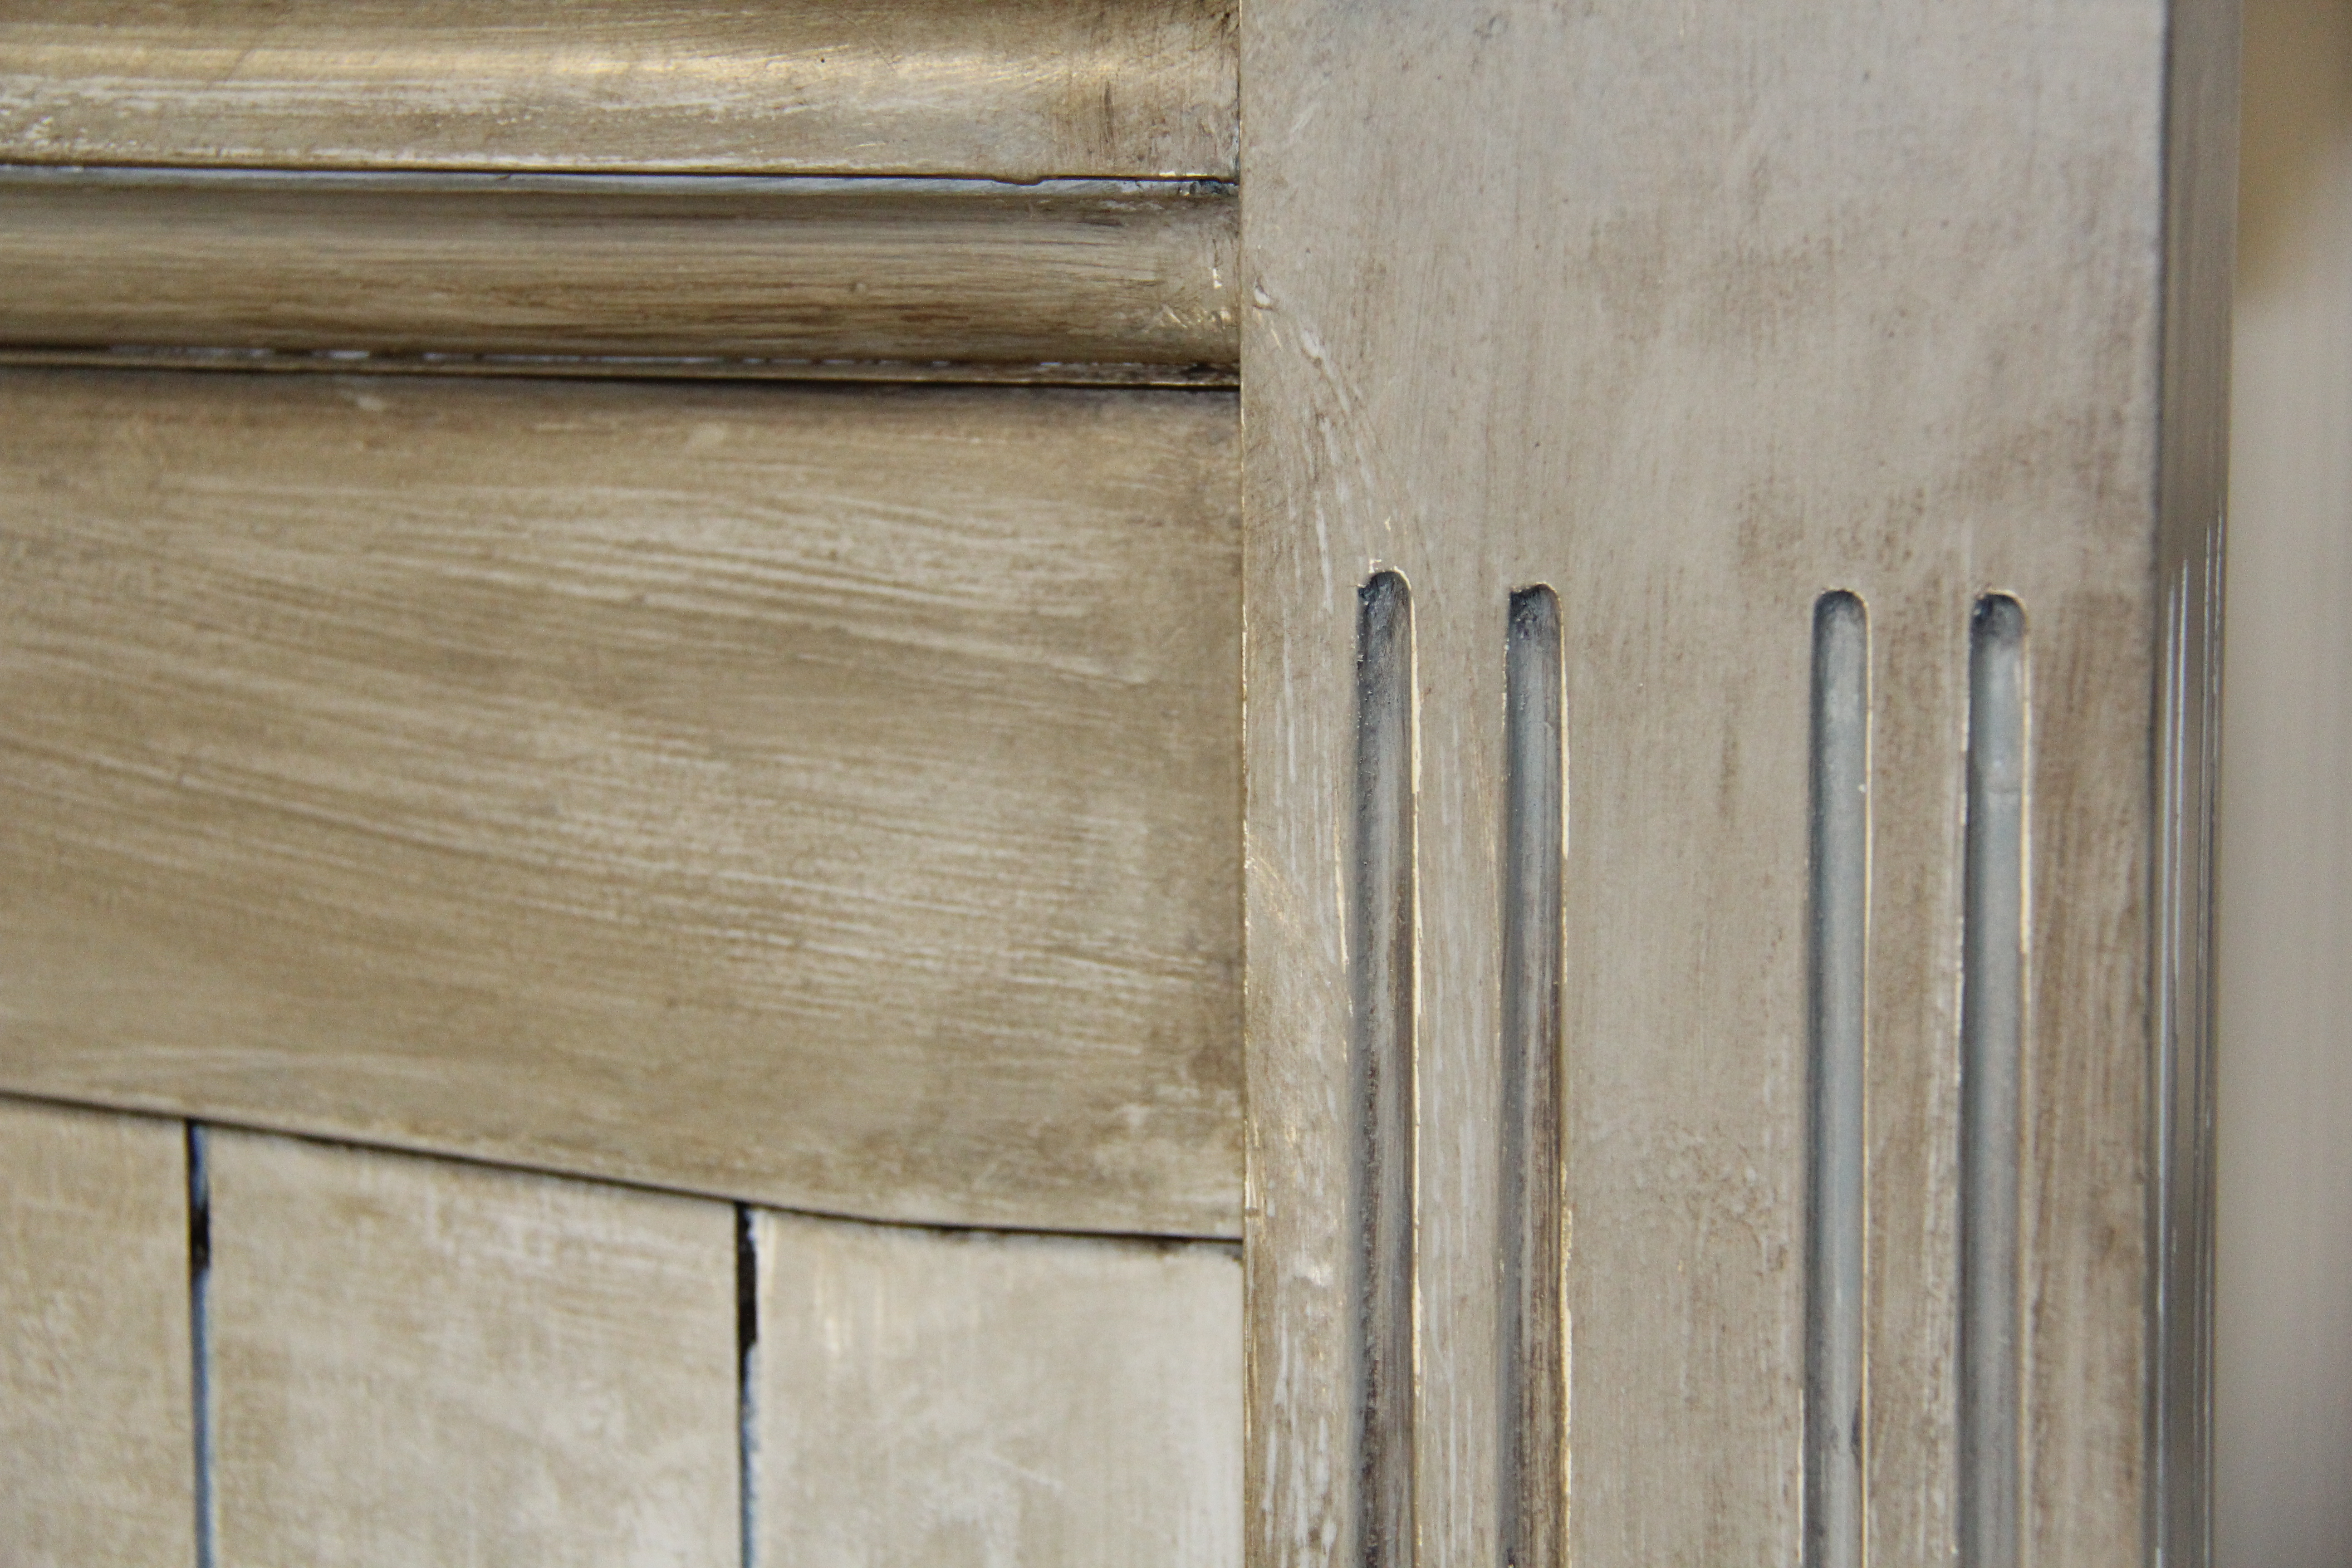
first, Josh painted all the pieces white.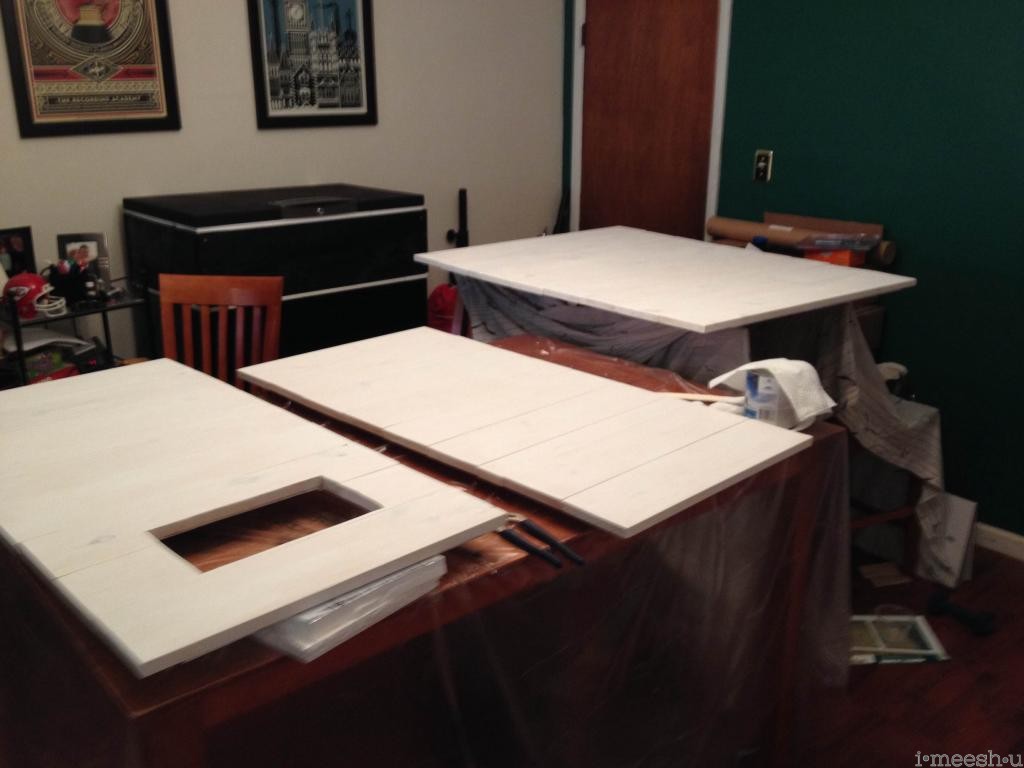
then he dry-brushed with Annie Sloan’s Paris Gray. 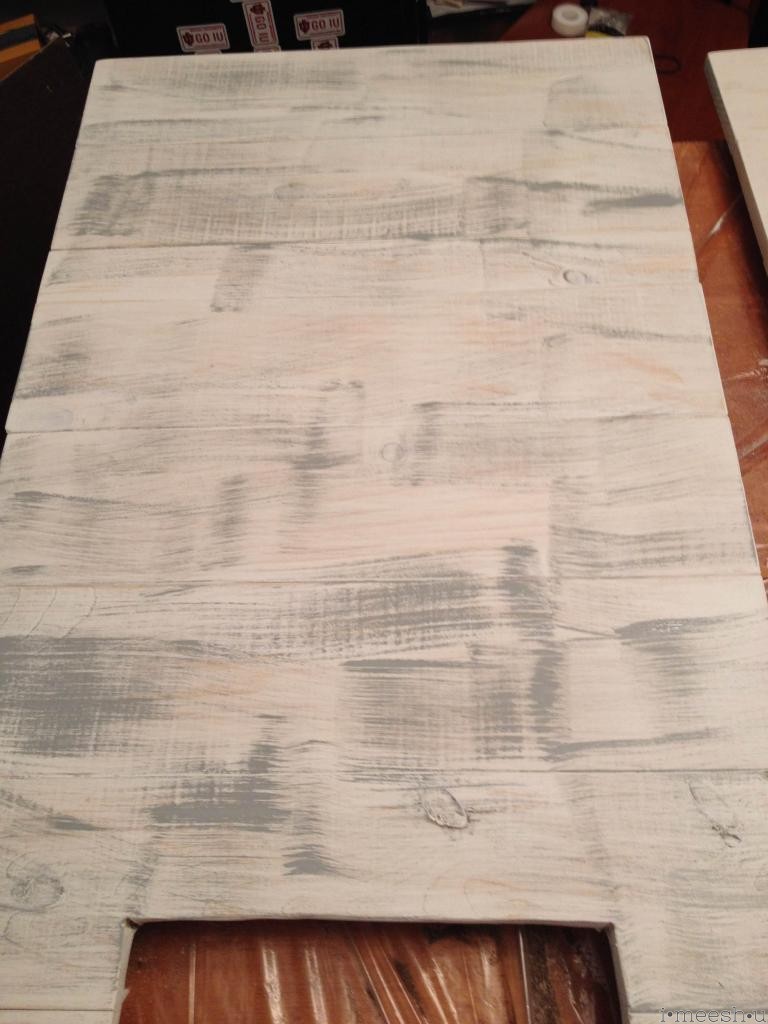
here’s a close-up of that dry brush work. very nice, light, brush strokes.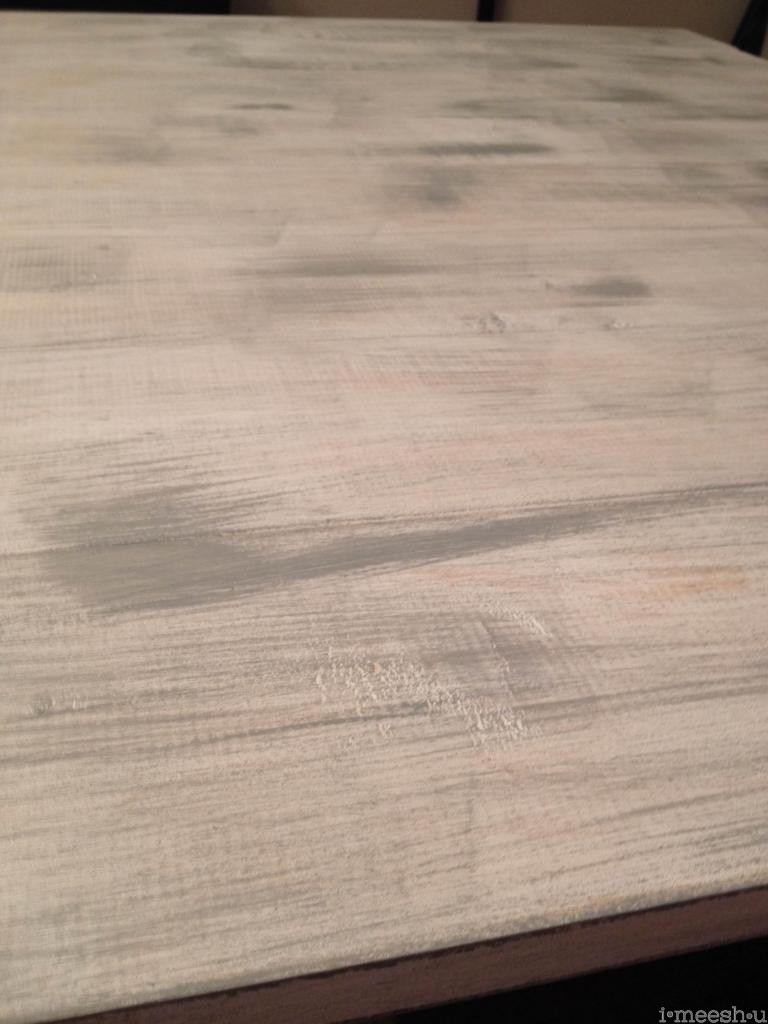
then he did a Graphite wash over the pieces, then immediately wiping off. you can make a wash by adding a lot of water to the paint so that it becomes watery and translucent rather than opaque once applied.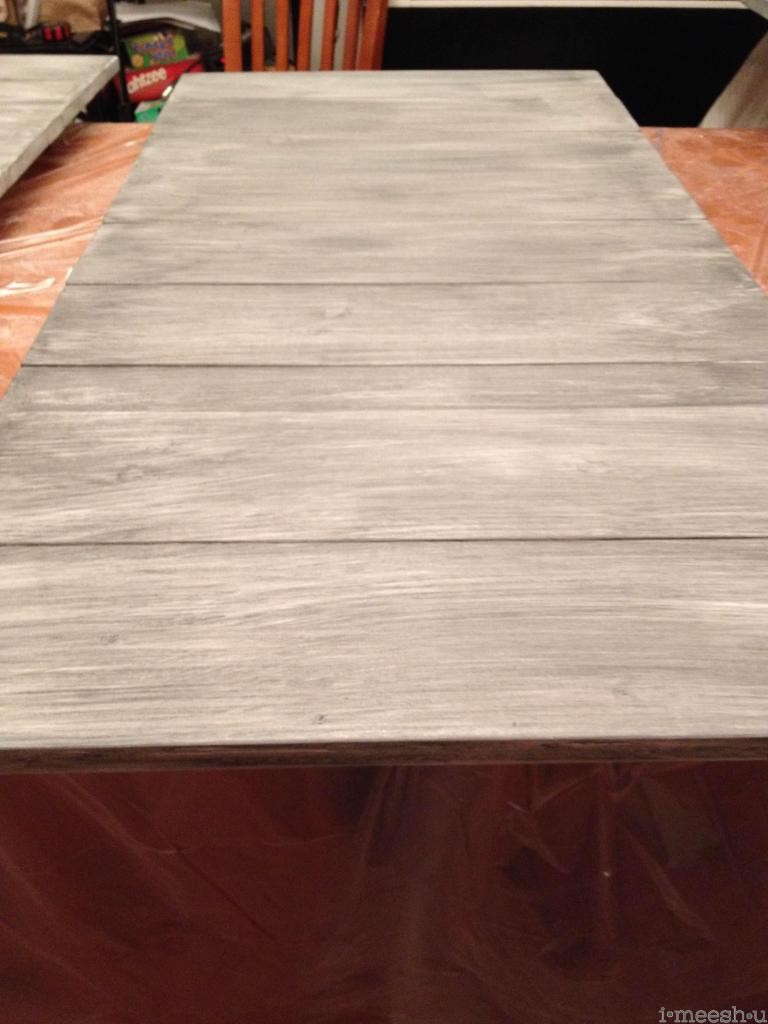
here’s Josh enjoying a home brew while the paint dries. in this case, watching paint dry is fun. 
there was a question about how to seal the piece. i’ve found that Annie Sloan’s wax doesn’t hold up too well with pieces that get wet a lot. given that this is a keg, i recommended Josh use a varnish.
i’ve REALLY fallen in love with Modern Masters’ Dead Flat Varnish and have used it on a dining table (3 coats) which seems to be holding up very nicely. it’s also used on our entertainment center and has held up beautifully for 3 years. the finish is completely flat, but smooth and silky. looks like a pro painted it!
So he added a few coats of matte varnish (not sure what brand he used here).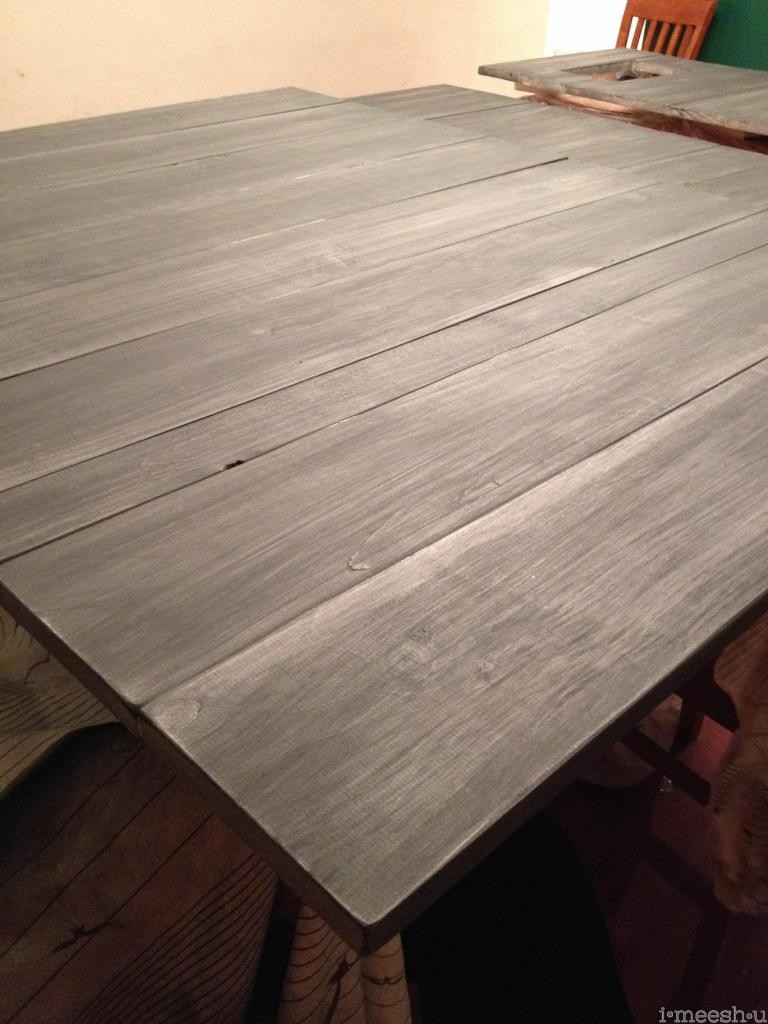
and check out how cool this final product is! a freezer keg with a Restoration Hardware finish and chalkboard top to easily communicate to friends which beer is being served. 
 congrats, Josh! so proud of this amazing work!!!
What teamwork!
And a really cool piece. I can see RH putting this in their catalogue for many $$. It’s just the thing people would pick up for their brewer, beer drinking friend.
Enjoy!
I’m looking to build a near identical design with the distressed/reclaimed look but living in Hawaii it’s pretty tough to get my hands on quality paint, chalk paint primarily. I’m looking for any alternatives from globo-paint companies out here, Sherwin Williams/Home Depot/Lowes/etc. Thanks!
I’d look into Webster’s Chalk Paint, which is a powder that you add to any color latex paint. It’s lighter and cheaper to be shipped to the islands. Aloha and good luck! 🙂
donyou know how many coats of the graphite wash he put on? I love how dark this is yet still warn looking.
I want to say I used 3 coats? Honestly, I just kept doing thin coats until it was the color I liked.
Josh! People love your work! How’s the keg holding up?
I’m not sure, but it looks like several layers of Graphite and a Paris Gray/Pure White wash. Layering helps achieve that warm look. Good luck!!
can I do this on a table that has Kona dark brown stain already on it? I have since put the steel wool and vinegar on it after sanding and it still isn’t what I’m looking for. I tried to put poly to seal it and I was back at square one, so I sanded again.
Valspar has a pretty nice chalk paint. You can buy it at Lowe’s.
I am looking to do this on a dining room table that’s full of scuffs and it’s orignal (and very worn) finish. If following these instructions, do I need to do any kind of sanding before starting?
Sorry for the delay in responding. No, you don’t need to sand unless you want the wood to be smooth and without any chips. Chalk paint takes the elbow grease out of having to sand or strip furniture. Good luck!
I want to paint my Thomasville bedroom piece to an off white color. The piece is too heavy to move so I don’t want to sand. Any tips
Yes! Don’t move the furniture. Remove everything in it, find a way to get a tarp underneath it, and remove any hardware that you don’t want painted. Then, using Annie Sloan Old White, paint the piece. Note that if the piece is dark, which it likely is, this will require 2-3 coats to get full coverage. Paint with the wood grain and be patient. I really like the big Annie Sloan paint brush as it grabs a lot of paint and brushes on evenly…but they’re expensive. I also love high quality Purdy brushes. Remember to wash your brushes right away so that you preserve them for future use.
When you’re done, use the clear wax with a soft t-shirt cloth.
Good luck and please send me pix when you’re done!
Ive had really good success making my own chalk paint. It’s nice because you can pick any paint color and its economical. A sample size of flat or matte paint with NO primer in it is usually plenty for most projects. You don’t need sheen when you’re just going to chalk it down anyway. Mix 1/3c plaster of Paris with a sqoosh under 1/3c hot water. Stir till any lumps dissolve, then add paint. Amazing stuff. You can cover and store in fridge. For larger projects, 1-1/2c paint, 1/2c plaster of Paris, 1/2c hot water.
I’ve had mixed results with PoP and would be careful with it as it can be very damaging to your lungs if you don’t take proper precautions when mixing. I always wear my 3M mask when sanding or using paints with fumes. Good luck! 🙂
My husband has made me a table for our lake house. I love the look on the keg. I do not know anything about chalk paint. Can you tell me the color you used? It looks like it has a good bit of grey which is my colors.. Is it hard? Haha. You have done great work.
Sandy
Chalk paint is a very forgiving paint that doesn’t require stripping or sanding before painting over surfaces. It saves time and money and looks great! We used layers of whites, light grays, and dark grays to achieve these looks. You can also buy Webster’s Chalk Paint which is a powder that you can add to any acrylic paint to allow it to behave like a chalk paint.
The method used to get this wispy layered look is called dry-brushing. You put paint on the brush, then wipe most of it off onto a rag, then very lightly brush with the grain of the wood.
Good luck! 🙂
I just stumbled upon your blog and WOW!! You are so talented and inspiring!!!!!!
I would love to do my kitchen cabinets like this! What do you think????? Would this stand up to everyday usage in the kitchen??? Ideas on cabinet pulls????
I look forward to following your blog?
For a kitchen, I wouldn’t use the wax as protection, but would instead use a few coats of Zars antique flat ultra fast drying poly. It’s truly flat and will protect much more against water. I haven’t been overly impressed with the protection wax offers.
Thanks for stopping by! I’m so glad that you’re enjoying the blog. 🙂
Thanks so much for all your great tips! I was wondering if the Zars can be applied over top of wax?
Did you do your cabinets? I am going to do my bathroom cabinets and thought I would touch base with you first for tips. I chalk painted my pool table with cloud white and it turned out beautiful!
Hi. No, I haven’t done a full kitchen of cabinets, but have done many custom bathroom sink pedestals repurposed from old dressers. It’s totally do-able, though a ton of work. I’d remove the hardware (I don’t prefer painted hardware as it cracks and will fall off over time anyway), and I highly recommend using at least 2 coats of Modern Masters Dead Flat to seal and protect the wood. I love a matte look, and that’s what you’ll get with this product. Also, MM doesn’t yellow over time.
Good luck! 🙂
Hello I am happy to have stumbled upon your site. I just chalk painted my bathroom cabinets, and already applied a thin layer of clear wax. Do you recommend i do a coat of modern masters dead flat to give it more protection? I also agree that the clear wax may not be enough for bathroom or kitchen cabinets. Thanks for any advice you can offer! 🙂
Maya
Hi Patty
I am thinking of doing my kitchen cabinets as well. What time of wood are you painting over? Have you started your project? How’s it going? Would love to know hear your step by step and see your results.
Sharon
Beautiful piece! Thanks for the tutorial. We were wondering were the small copper trough came from?
Thanks
Thanks! I’m not sure as it was one of my readers who built this keezer. 🙂
We are refinishing a family owned 85 year old table, looks exactly like what everyone is trying to build these days. We had to take it apart pc by pc to strip old stain and sand, and remove all ancient nails. It looks exactly how I would like it to look except there are two different types of wood used to build the table originally. Not quite sure what paint to use because we love the integrity of the current table itself with all imperfections. The table is built with each slat locked horizontal, every other pc is oak then redwood. It makes for an interesting look, but was hoping for a more weathered grey finish. Any suggestions? Also, I want the matte finish as you suggested with the Modern Masters Dead Flat. Would you suggest this varnish compared to water based polyurethane for a dining table this aged that will be used for years to come?? Thank you for any advice… brand new to this! Rachel
Hi Meesh
I love your work. I’m new to painting furniture but I’d really like to copy the restoration hardware finish on a dining table. The table is particle board with a wood veneer. The current sreal on the table looks like a crackle effect & there is bad water damage. I have a tin of Annie Sloan pure white and I’m aiming for a lightish grey finish. Is it necessary for me to strip and sand before I wash?
Your advice will be greatly appreciated.
Rezina
Hi Rezina! No, you won’t need to strip, but you may want to lightly sand away some of the crackle as any paint that goes over it may still have that bumpy texture. To achieve a light gray finish, you may want to also pick up some Annie Sloan Paris Gray and mix it in with the white or do a layered effect. I’d first paint the piece white, then mix the Paris Gray with water (maybe 50/50?). Dip your brush in the gray and wipe most of it off so that the brush is nearly dry. Use the brush to go with the grain of the wood to get some gray into your piece. This is called dry brushing. Wipe off and keep layering the grays and whites until you get your desired look.
Good luck!
Hi!
Is there a list of all materials used for the paint project anywhere?
I don’t. I’m so sorry as this was a project one of my readers sent to me.
Hi. I love your “zero to hero” coffee table. Is it possible to get that same look on laminate and veneer or must it be real wood to achieve that look?
In one comment you mention adding a few drops of old english to get a brown tint. What old english are you referring to? I am working on a very similar version and have just applied the graphite wash but it is to grey. Id love some brown tones mixed in!
Hi. Yes, it’s Old English – Scratch Cover For Dark Wood. Very inexpensive and you can get it everywhere, including WalMart. It’s a product that’s been on the market forever and is oily. I added a few drops to my paint to give it some brown tints, but you may also consider Funiture Paint’s Brown Tinted Easy Wax as it’s a very easy liquidy wax that you can apply in various places on your piece to bring some browns. I find much easier to apply than Annie Sloan’s dark wax. There are several different tints from which to choose. Good luck and please report back! 🙂
Thanks! I ended up actually going back and getting a sample of AS Coco and doing a 1:1 wash with it. Im really happy with the way it turned out. Im waiting on a few more parts to come in this week but will post a picture of the finished product later this week! This post was super helpful! Thank you!